DidDogEat? Dashbutton to Raspberry Pi to Slack
Amazon dash buttons are wifi connected devices that you are supposed to configure with your prime account so you can order a preselected product at the click of the button.
It turns out the internet has found many ways to repurpose them for IoT projects.
Normally dash buttons sell for $5 (which gets refunded after your first purchase), but on prime day last week they were selling for 99 cents so I decided to buy a few to play around with.
This post covers how I setup a dashbutton, raspberry pi, and slack app to keep track of the dog getting fed.
And this is George. He is a good boy.

What I used
- Raspberry Pi Zero W ($10)
- SanDisk Ultra 32GB microSD ($12.99)
- Amazon dash button
- MicroUSB power supply
- Laptop running macOS Sierra
Kind of expensive for a button project, but I have a couple apps, like this flight checkin app, running on an aws t2.nano instance that I should be able to move to the pi.
Also, I didn’t get a case but these aluminum keychain ones look sweet.
Raspberry Pi Zero W setup
First I followed the instructions here: Preparing an SD Card for your Raspberry Pi. You’ll have some options, I chose to go with the Raspian Jessie Lite image because I don’t need the desktop functionality and no way I was choosing the image called “NOOBS”.
To flash the image onto my SD card, I broke away from the adafruit instructions and used these.
Note: Make sure the micro SD adapter toggle is set to the unlocked position when you put it into your machine. Also as a heads up the dd command took ~20 minutes to finish, so it probably would have been faster and safer to just download the etcher software and do what adafruit recommends…
Next I moved onto the instructions starting here: Raspberry Pi Zero Headless Quick Start Text File Editing. Once I was able to SSH in, I changed the default password and then ran the following:
## contents from setup_script_1.sh

sudo apt update
sudo apt upgrade -y

sudo apt install git -y
sudo apt install emacs -y

# set up git, modify for yourself

git config --global user.name "Patrick Renschler"
git config --global user.email myemail@email.com
git config --global core.editor emacs
git config --list

# clone rest of setup commands from my public repo

git clone https://github.com/renschler/dash_setups.git
cd dash_setups

# run rest of setup commands

./pi_setup_script_2.sh

# run the setup commands for this dash button project

./dash_button_setup.sh
The scripts will install git, install emacs (a text editor), change various environment settings, and then install the python libraries you need for this project. You can review all the code here: https://github.com/renschler/dash_setups.
If you don’t care for emacs you can comment out those lines. If you want to check it out here’s the emacs tutorial I used to get started in college. It provides documentation for the .emacs file included in my setups repository.
Lastly I added the following line to my laptop’s .bash_profile, I use this convention for connecting to other machines that have harder to remember ssh commands.
# pi zero ssh

alias pi-z-ssh='ssh pi@raspberrypi.local'
Dash button setup
There’s two things you need to do here: get the MAC address of your button, and then configure it for your home wifi network.
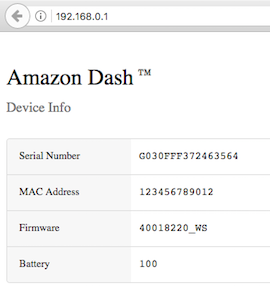
Press the dash button and hold it down until the blue light comes on. On your laptop or phone, look for a wifi network named “Amazon ConfigureMe” and then join it. Open up a browser and go to 192.168.0.1. This should show you a page that has your button’s MAC address which you’ll need to write down.
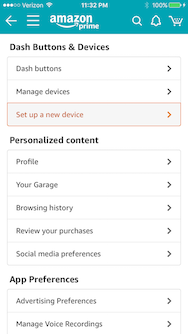
The easiest way (only way? lol) to set up your dash button on your home wifi is to use the amazon mobile app. Sign into your amazon account, then open the menu from the top left and click “Your Account”.
Scroll down to “Dash Buttons & Devices”, and click the “Set up a new device” option.
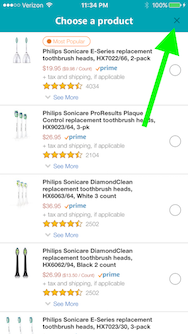
Follow the instructions to set up your dash button but do not select a product. Click the X in the top right and exit the setup before choosing what product you want to order.
Tcpdump
Ok assuming your amazon dash button and raspberry pi are connected to the same wifi network, we can use tcpdump to listen for your button being pushed.
SSH back into your pi, and run this command substituting in the MAC address of your dash button.
# Modify with the mac address of your dash button

sudo tcpdump ether host b4:7c:9c:3a:00:d4
Click your dash button and you should see some packets! Hit CTRL-C to stop tcpdump.
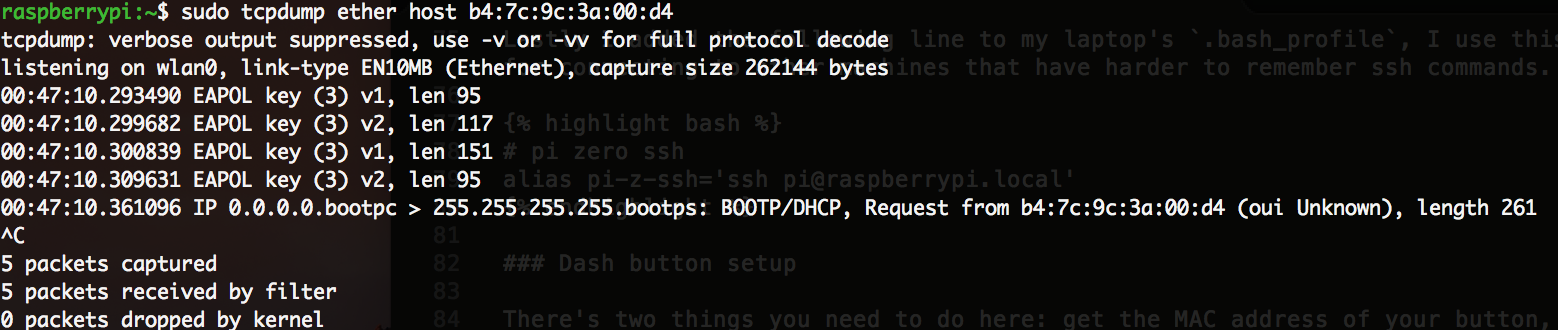
It looks like everytime we click the dash button it broadcasts a DHCP packet, so we can use that as our trigger.
Python
Now we will use the python library scapy to listen for the click of your dash button (like tcpdump), and then print “Hello world” when it is detected.
Create a new file called dashbutton.py and paste this into it:
from scapy.all import \*

def feed_dog():
print "Hello, world!"
return

# substitute in your mac address

dashset = set(["b4:7c:9c:3a:00:d4"])
dashdict = {"b4:7c:9c:3a:00:d4":feed_dog}

def dhcp_display(pkt):
print "DHCP packet from: "+ pkt[Ether].src
dashdict[pkt[Ether].src]()
return

print sniff(prn=dhcp_display, lfilter = lambda x: x.haslayer(DHCP) and x[Ether].src in dashset, store=0, count=0)
Start the program with sudo python dashbutton.py, click your button, you should get a Hello, World!
Adding slack
The last step to this project is integrating slack’s python library so that when we detect a button press we can post a message to the #dogfood channel saying the dog was fed.
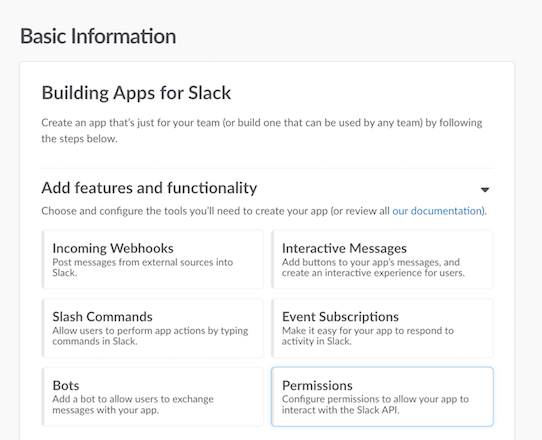
If you don’t have a slack team yet, you’ll need to make one. Next, sign into your team and go to the building slack apps page. Click the green “Create a Slack App” button. When you get to the ‘Basic Information’ page, click the Permissions tile.
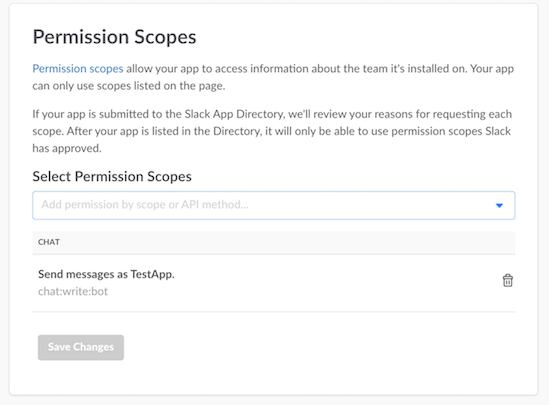
Then scroll down to ‘Permission Scopes’, add the “Send messages as [APP_NAME]” permission, and save changes.
On the same page, at the top, click the green button that says “Install App to Team”. When you’ve finished that you’ll land on the page with an OAuth Access Token displayed. You will need this to send messages from our python program.
Reopen the dashbutton.py program, and modify it so that it matches what’s below:
from scapy.all import \*
from slackclient import SlackClient
import os

slack_token = os.environ["SLACK_BOT_TOKEN"]
sc = SlackClient(slack_token)

def feed_dog():
sc.api_call(
"chat.postMessage",
channel="#dogfood",
text="The dog just got food! :tada:"
)
return

# substitute in your mac address

dashset = set(["b4:7c:9c:3a:00:d4"])
dashdict = {"b4:7c:9c:3a:00:d4":feed_dog}

def dhcp_display(pkt):
print "DHCP packet from: "+ pkt[Ether].src
dashdict[pkt[Ether].src]()
return

print sniff(prn=dhcp_display, lfilter = lambda x: x.haslayer(DHCP) and x[Ether].src in dashset, store=0, count=0)
Assuming you have a channel named #dogfood, you can start this program with
sudo SLACK_BOT_TOKEN="PASTE-IN-YOUR-TOKEN" python dashbutton.pyWhen you click the dash button you should see a message show up from your app in the #dogfood channel!
The very last thing I did was schedule a cron job that will start this program everytime the raspberry pi reboots.
Type crontab -e into the terminal, and then add the following line, as it’s own line, at the bottom of the file. Do not preface it with a #.
@reboot cd; sudo SLACK_BOT_TOKEN="PASTE-IN-YOUR-TOKEN" python dashbutton.pyThen leave one empty line below that command, before the end of the file, and you are good to exit. Although, depending on where the dashbutton.py file is located on your pi, you may have to change that command so it has the right path.
But ya that’s it! If you ever want to support more dash buttons on your network, you can add additional functions and MAC Addresses to the dashdict & dashset objects.
Related but different
Links
- Why I stopped hacking the amazon dash button and learned how to solder
- IFTTT Smart Button
- Emergency Food Button:
From the first time I saw the Amazon dash button, I was impressed by its simplicity, and thought that it, or something like it at around the same price point, would be very useful. Unfortunately, it’s not open at all, and the more open alternatives are still not very open and cost at least seven times as much. Therefore, the reasonable thing for me to do is to sink a few thousand dollars’ worth of my time into making one myself!
Alexa skills
I also checked out making an Alexa skill instead of connecting with slack. I went through the quick start tutorial, but my takeway was that the platform is too restrictive in terms of how you have to summon your skill.
Take my dog food app as an example. I wanted to make a skill so that anyone in house could just be like “Alexa, did the dog eat?”, “Alexa, did someone feed the dog?”, “Alexa, has the dog had dinner?”… If Alexa has my skill installed, it should know to use my skill to answer those questions. Instead you have to give your skill a trigger name like “Dog App”, and then people would have to say something like, “Alexa ask Dog App if the dog ate”, or “Alexa open Dog App”, or just “Alexa, Dog App”. People need to remember what the app is called, which is bad UX. It’s fine when your skill is brand related; everyone will remember that to hail an uber you have to say the word uber. But for smart home style questions, it seems very limiting.
When you build your skill, you provide all the possible use phrases, the ones that I mentioned earlier, like “did the dog eat” or “when did the dog eat” and you map these to a specific intent which your program can use to decide what to execute and return. So your skill effectively creates a mapping of ‘things that can be asked’ to ‘operations that should be performed or information that should be provided’, but it’s conditional on being triggered by the app name. I assume that was done to avoid the issue of having conflicts between different skills. Or maybe Amazon wants to keep control over these coloquial queries, and eventually release some Amazon-only smart home solution. I don’t know.
I tried to game it, but still wasn’t satisfied. Your skill name can only be 3 words or less, so I tried “did thedog eat”. Then when I said “Alexa, did the dog eat?”, my app was triggered. But you lose the flexibility of having multiple detection phrases, so everyone still has to remember to say “did the dog eat” and not one of the other ways to ask…
Anyways, this is what I gathered from the quick start tutorial and like 20 min of reading the docs. So I thought it would be easier for my family to just check a slack channel when they wanted to know if the dog was fed.